The Genesis eNews Extended plugin allows you to add an opt-in form to a widget area, such as a sidebar or footer, so readers can subscribe to your mailing list. You can configure the form to build your email list for several popular email marketing services, including AWeber, ConvertKit, MailChimp, and more.
To get started, install and activate Genesis eNews Extended. See How to Install and Activate a Plugin for more information.
Once you’ve installed and activated the plugin, go to Appearance > Widgets in your WordPress dashboard and complete the following to add the form to a widget area.

- Click on the widget title bar of Genesis eNews Extended.
- Select the desired widget area from the list. In this example, we’re adding the widget to the Primary Sidebar widget area.
- Click Add Widget.
The widget will open in the selected widget area.
Before you adding the information for your specific email marketing service, there are several settings you can configure that apply to all services, as described below:

- Title: Add a title, if desired (optional).
- Text To Show Before Form: Add any text you’d like to display before the form. For example, this text can include a brief explanation of what subscribers can expect when joining your email list.
- Text To Show After Form: Add any text you’d like to display after the form. For example, you can add a disclaimer stating that you won’t share your subscriber’s email address.
- First Name Input Text: Enter the default text that you’d like to display in the First Name field (if applicable).
- Last Name Input Text: Enter the default text that you’d like to display in the Last Name Field (if applicable).
- E-Mail Input Text: Enter the default text that you’d like to display in the E-Mail field.
- Button Text: Enter the text that you’d like to display on the button that submits the form.
Now you’re ready to configure the widget for your email marketing service – see below to learn how to configure the widget with some popular email marketing services:
Select your email marketing service above to learn how to configure it with the widget.
AWeber
Learn how to configure the widget with AWeber below.
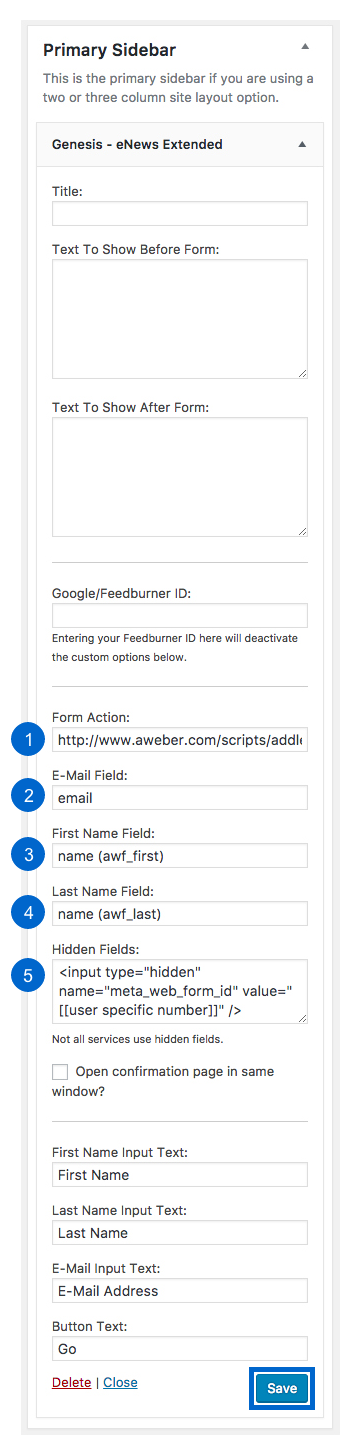
- Form Action: Enter the form action URL of your form from your AWeber account. Note: The URL above is for demonstration only – you must use your form-specific URL from your AWeber account.
- E-Mail Field: Enter email so you can collect readers’ email addresses.
- First Name Field: If you are collecting first names, enter name (awf_first).
- Last Name Field: If you are collecting last names, enter name (awf_last).
- Hidden Fields: Enter the hidden fields of your form from your AWeber account. Note: The hidden fields above are for demonstration only – you must use your form-specific hidden fields from your AWeber account.
Click Save to preserve your settings.
Learn more about configuring the Genesis eNews Extended widget with AWeber.
Constant Contact
Learn how to configure the widget with Constant Contact below.

- Form Action: Enter the form action URL of your form from your Constant Contact account. Note: The URL above is for demonstration only – you must use your form-specific URL from your Constant Contact account.
- E-Mail Field: Enter ea so you can collect readers’ email addresses.
- Hidden Fields: Enter the hidden fields of your form from your Constant Contact account. Note: The hidden fields above are for demonstration only – you must use your form-specific hidden fields from your Constant Contact account.
Click Save to preserve your settings.
Learn more about configuring the Genesis eNews Extended widget with Constant Contact.
ConvertKit
Learn how to configure the widget with ConvertKit below.

- Form Action: This is the URL of your ConvertKit form, for example: https://app.convertkit.com/landing_pages/12345/subscribe.html. Note: The URL is for demonstration only – you must use to your form-specific URL to configure the widget for ConvertKit.
- E-Mail Field: Enter email so you can collect readers’ email addresses.
- First Name Field: If you are collecting first names, enter first_name.
Click Save to preserve your settings.
Learn more about configuring the Genesis eNews Extended widget with ConvertKit.
FeedBlitz
Learn how to configure the widget with FeedBlitz below.

- Form Action: Enter the form action URL of your form from your FeedBlitz account. Note: The URL above is for demonstration only – you must use your form-specific URL from your Feedblitz account.
- E-Mail Field: Enter EMAIL so you can collect readers’ email addresses.
- Hidden Fields: Enter the hidden fields of your form from your FeedBlitz account. Note: The hidden fields above are for demonstration only – you must use your form-specific hidden fields from your FeedBlitz account.
Click Save to preserve your settings.
Learn more about configuring the Genesis eNews Extended widget with FeedBlitz.
GetResponse
Learn how to configure the widget with GetResponse below.

- Form Action: Enter the form action URL of your form from your GetResponse account. Note: The URL above is for demonstration only – you must use your form-specific URL from your GetResponse account.
- E-Mail Field: Enter email so you can collect readers’ email addresses.
- First Name Field: If you are collecting first names, enter name.
- Hidden Fields: Enter the hidden fields of your form from your GetResponse account. Note: The hidden fields above are for demonstration only – you must use your form-specific hidden fields from your GetResponse account.
Click Save to preserve your settings.
Learn more about configuring the Genesis eNews Extended widget with GetResponse.
Infusionsoft
Learn how to configure the widget with Infusionsoft below.

- Form Action: Enter the form action URL of your form from your Infusionsoft account. Note: The URL above is for demonstration only – you must use your form-specific URL from your Infusionsoft account.
- E-Mail Field: Enter inf_field_Email so you can collect readers’ email addresses.
- First Name Field: If you are collecting first names, enter inf_field_FirstName.
- Last Name Field: If you are collecting last names, enter inf_field_LastName.
- Hidden Fields: Enter the hidden fields of your form from your Infusionsoft account. Note: The hidden fields above are for demonstration only – you must use your form-specific hidden fields from your Infusionsoft account.
Click Save to preserve your settings.
Learn more about configuring the Genesis eNews Extended widget with Infusionsoft.
Mad Mimi
Learn how to configure the widget with Mad Mimi below.
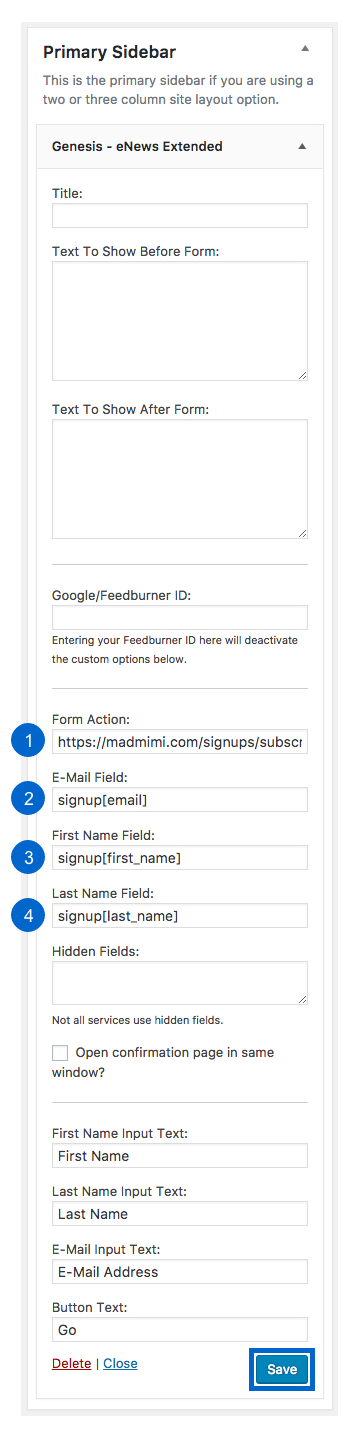
- Form Action: Enter the form action URL of your form from your Mad Mimi account. Note: The URL above is for demonstration only – you must use your form-specific URL from your Mad Mimi account.
- E-Mail Field: Enter signup[email] so you can collect readers’ email addresses.
- First Name Field: If you are collecting first names, enter signup[first_name].
- Last Name Field: If you are collecting last names, enter signup[last_name].
Click Save to preserve your settings.
Learn more about configuring the Genesis eNews Extended widget with Mad Mimi.
MailChimp
Learn how to configure the widget with MailChimp below.

- Form Action: Enter the form action URL of your form from your MailChimp account. Note: The URL above is for demonstration only – you must use your form-specific URL from your MailChimp account.
- E-Mail Field: Enter EMAIL so you can collect readers’ email addresses.
- First Name Field: If you are collecting first names, enter FNAME.
- Last Name Field: If you are collecting last names, enter LNAME.
Click Save to preserve your settings.
Learn more about configuring the Genesis eNews Extended widget with MailChimp.